
產(chǎn)品中心
美國(guó)強(qiáng)鹿柴油機(jī)維修配件技術(shù)中心
約翰迪爾John Deere柴油機(jī)配件 美國(guó)麥克福斯
卡特彼勒柴油發(fā)動(dòng)機(jī)參數(shù)
沃爾沃發(fā)動(dòng)機(jī)全系參數(shù)
英國(guó)珀金斯原廠配件
珀金斯柴油機(jī)技術(shù)中心
珀金斯發(fā)動(dòng)機(jī)零件查詢圖冊(cè)
日本三菱柴油機(jī)發(fā)電機(jī)配件
德國(guó)道依茨 韓國(guó)大宇柴油發(fā)動(dòng)機(jī)配件
康明斯全系列柴油發(fā)動(dòng)機(jī)
沃爾沃 MTU 原廠配件銷售中心
瑞典沃爾沃遍達(dá)原裝柴油機(jī)配件
康明斯維修技術(shù)中心
卡特彼勒柴油發(fā)動(dòng)機(jī)原廠配件銷售中心
品牌柴油發(fā)電機(jī)組
康明斯柴油發(fā)動(dòng)機(jī)配件中心
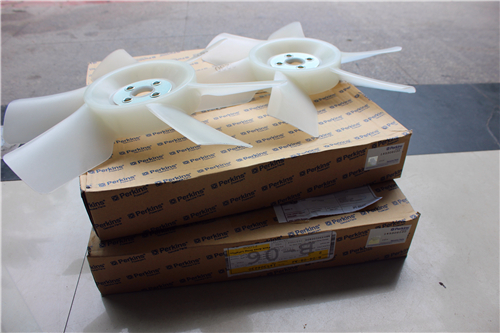
Perkins珀金斯1000柴油發(fā)動(dòng)機(jī)31258185風(fēng)扇
詳細(xì)描述
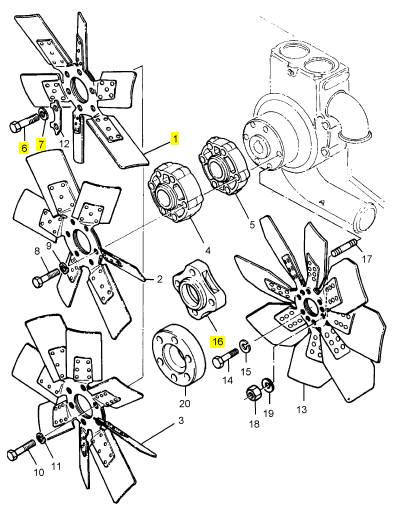
項(xiàng)目 零配件號(hào)碼 最新件號(hào) 描述
1 31258185 1 31258185 風(fēng)扇
6 0746259 4 0746259 螺旋
7 0920053 4 0920053 墊圈
16 3748 W201 1 3748 W202 伸長(zhǎng)
項(xiàng)目 零配件號(hào)碼 最新件號(hào) 描述
3 2614 B656 1 2614 B656 帶
6 38167161 1 38167161 托架
7 0826264 1 0826264 圖釘
8 33134427 1 33134427 間隔器
9 36151505 1 36151505 墊圈
10 0576002 1 0576002 螺帽
11 0920003 1 0920003 墊圈
12 0920053 1 0920053 墊圈
13 0826264 1 0826264 圖釘
14 33134427 1 33134427 間隔器
15 36151505 1 36151505 墊圈
16 0576002 1 0576002 螺帽
17 0920003 1 0920003 墊圈
18 0920053 1 0920053 墊圈
19 0746456 1 0746456 螺旋
20 0920004 1 0920004 墊圈
21 0920054 1 0920054 墊圈
22 2184467 1 2184467 螺拴
23 33283509 1 33283509 襯套
24 0920006 1 0920006 墊圈
25 0920006 1 0920006 墊圈
26 0920055 1 0920055 墊圈
28 0746459 1 0746459 螺旋
29 0576051 1 0576051 螺帽
30 0920004 1 0920004 墊圈
31 0920004 1 0920004 墊圈
32 0920054 1 0920054 墊圈
33 36154105 1 36154105 板
34 0746456 1 0746456 螺旋
35 0576051 1 0576051 螺帽
36 33135119 1 33135119 間隔器
37 0920054 1 0920054 墊圈
38 33134427 2 33134427 間隔器
39 0746257 2 0746257 螺旋
|
KENR6906 |
|
57 Disassembly and Assembly Section |
|
NOTICE Keep all parts clean from contaminants. |
|
Contaminants may cause rapid wear and shortened component life. |
|
g01397091 |
|
Illustration 128 |
|
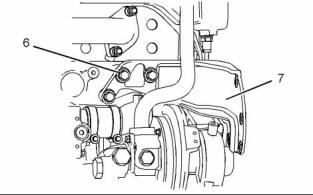
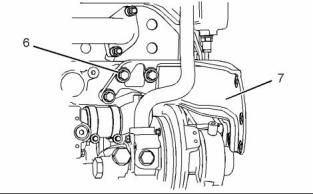
6. If necessary, follow Steps 6.a and 6.b in order to remove the support bracket. |
|
a. Remove bolts (6). |
|
g01386146 |
|
Illustration 126 |
|
b. Remove support bracket (7). |
|
i02767679 |
|
Front Plate - Install |
|
Installation Procedure |
|
NOTICE Keep all parts clean from contaminants. |
|
Contaminants may cause rapid wear and shortened component life. |
|
g01397095 |
|
Illustration 127 |
|
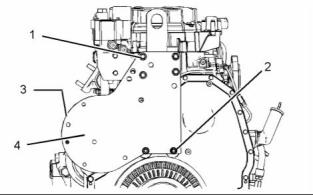
1. Remove bolts (3) (not shown) that secure plate (4) to the support bracket. |
|
2. Remove nuts (1). |
|
3. Support the weight of plate (4). The weight of the plate is approximately 25 kg (55 lb). |
|
4. Remove nuts (2) and remove plate (4). |
|
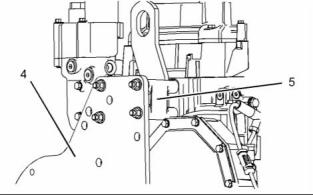
5. Remove spacer (5) from the cylinder head. Note the routing of the wiring harness between the spacer and the cylinder head. |
|
g01397091 |
|
Illustration 129 |
|
1. If support bracket (7) was removed, position the support bracket on the cylinder block and install bolts (6) finger tight. |
|
This document has been printed from SPI². Not for Resale |
![]()
![]()
![]()
![]()
![]()
![]()
![]()
![]()
![]()
|
58 |
|
KENR6906 |
|
Disassembly and Assembly Section |
|
b. Install the belt tightener. Refer to Disassembly and Assembly, “Belt Tightener - Install”. |
|
i02754819 Crankcase Breather - Remove and Install |
|
(Closed Breather) |
|
Removal Procedure |
|
g01397095 |
|
Illustration 130 |
|
NOTICE |
|
Keep all parts clean from contaminants. |
|
Contaminants may cause rapid wear and shortened component life. |
|
NOTICE |
|
Care must be taken to ensure that fluids are contained during performance of inspection, maintenance, test- ing, adjusting and repair of the product. Be prepared to collect the fluid with suitable containers before open- ing any compartment or disassembling any compo- nent containing fluids. |
|
Dispose of all fluids according to local regulations and mandates. |
|
g01386146 |
|
Illustration 131 |
|
2. Install spacer (5) to the cylinder head. |
|
Note: Ensure the correct routing of the wiring harness around the spacer. |
|
3. Position plate (4) on the studs and install nuts (1) and (2). |
|
4. Tighten nuts (1) and (2) to a torque of 100 N·m (74 lb ft). |
|
5. Install bolts (3) (not shown) finger tight. |
|
6. If support bracket (7) was removed, tighten bolts (6) to a torque of 55 N·m (41 lb ft). Refer to Illustration 129. |
|
7. Tighten bolts (3) (not shown) to a torque of 55 N·m (41 lb ft). |
|
Note: Ensure that the plate is not stressed as the |
|
bolts are tightened. |
|
g01401970 |
|
Illustration 132 |
|
End By: |
|
1. Loosen the clamp and disconnect hose (1) from |
|
crankcase breather (4). |
|
a. Install the fan drive. Refer to Disassembly and |
|
Assembly, “Fan Drive - Install”. |
|
2. Loosen the clamp and disconnect hose (3) from |
|
crankcase breather (4). |
|
This document has been printed from SPI². Not for Resale |
![]()
![]()

![]()

![]()
![]()
![]()
![]()
![]()

|
KENR6906 |
|
59 Disassembly and Assembly Section |
|
3. Disconnect hose (5) from crankcase breather (4). |
|
i02790384 Crankcase Breather - Remove and Install |
|
4. Remove bolts (2) and remove crankcase breather (4) from the mounting bracket. |
|
(Open Breather) |
|
5. If necessary, disassemble crankcase breather (4). Refer to Operation and Maintenance Manual, “Engine Crankcase Breather - Replace” for the correct procedure. |
|
Removal Procedure |
|
Installation Procedure |
|
NOTICE |
|
Keep all parts clean from contaminants. |
|
NOTICE |
|
Keep all parts clean from contaminants. |
|
Contaminants may cause rapid wear and shortened component life. |
|
Contaminants may cause rapid wear and shortened component life. |
|
g01401675 |
|
Illustration 134 |
|
g01401970 |
|
Illustration 133 |
|
1. Remove bolt (2), clip (3) and spacer (4). |
|
1. Ensure that hoses (1), (3) and (5) are clean and free from restriction. |
|
2. Loosen the hose clamp and remove hose (1) from the valve mechanism cover base. |
|
2. If necessary, assemble crankcase breather (4). Refer to Operation and Maintenance Manual, “Engine Crankcase Breather - Replace” for the correct procedure. |
|
Installation Procedure |
|
NOTICE |
|
Keep all parts clean from contaminants. |
|
3. Position crankcase breather (4) on the mounting bracket and install bolts (2). Tighten the bolts to a torque of 28 N·m (21 lb ft). |
|
Contaminants may cause rapid wear and shortened component life. |
|
4. Connect hose (5) to crankcase breather (4). Tighten the nut securely. |
|
5. Connect hose (3) to crankcase breather (4). Tighten the clamp securely. |
|
6. Connect hose (1) to crankcase breather (4). Tighten the clamp securely. |
|
This document has been printed from SPI². Not for Resale |
