
產(chǎn)品中心
美國(guó)強(qiáng)鹿柴油機(jī)維修配件技術(shù)中心
約翰迪爾John Deere柴油機(jī)配件 美國(guó)麥克福斯
卡特彼勒柴油發(fā)動(dòng)機(jī)參數(shù)
沃爾沃發(fā)動(dòng)機(jī)全系參數(shù)
英國(guó)珀金斯原廠配件
珀金斯柴油機(jī)技術(shù)中心
珀金斯發(fā)動(dòng)機(jī)零件查詢圖冊(cè)
日本三菱柴油機(jī)發(fā)電機(jī)配件
德國(guó)道依茨 韓國(guó)大宇柴油發(fā)動(dòng)機(jī)配件
康明斯全系列柴油發(fā)動(dòng)機(jī)
沃爾沃 MTU 原廠配件銷售中心
瑞典沃爾沃遍達(dá)原裝柴油機(jī)配件
康明斯維修技術(shù)中心
卡特彼勒柴油發(fā)動(dòng)機(jī)原廠配件銷售中心
品牌柴油發(fā)電機(jī)組
康明斯柴油發(fā)動(dòng)機(jī)配件中心
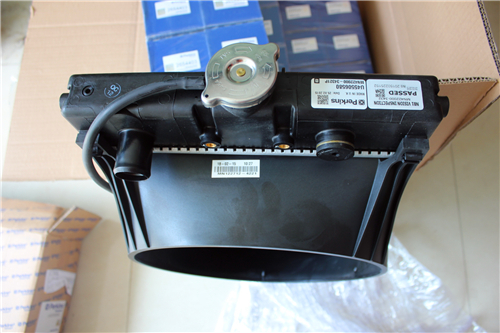
Perkins珀金斯850-854F柴油發(fā)動(dòng)機(jī)水箱T415306散熱器
詳細(xì)描述
項(xiàng)目 零配件號(hào)碼 最新件號(hào) 描述
1 T415306 1 T415306 散熱器
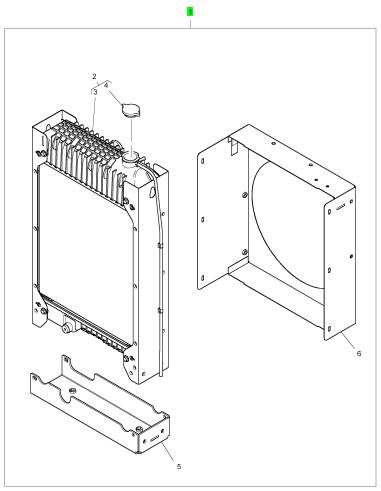
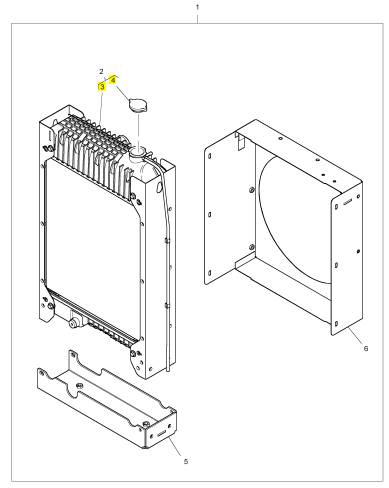
項(xiàng)目 零配件號(hào)碼 最新件號(hào) 描述
3 1 散熱器
4 24850073 1 24850073 散熱器蓋
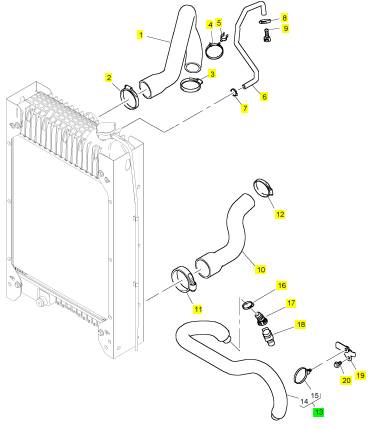
項(xiàng)目 零配件號(hào)碼 最新件號(hào) 描述
1 T414610 1 T414610 水管 -冷卻器
2 0180070 1 21825194 夾
3 0180069 1 21825199 夾
4 T413017 2 T413017 纜拉桿
5 T413022 2 T413022 水管夾
6 T412979 1 T412979 水管
7 0180063 1 2481883 夾
8 0180063 1 2481883 夾
9 T411998 1 T411998 連接器
10 T411303 1 T411303 水管 -冷卻器
11 0180071 1 0180071 夾
12 0180069 1 21825199 夾
13 T412096 1 T412096 水管 -冷卻器
16 0180064 1 21825196 夾
17 T412089 1 T412089 連接器
18 T412087 1 T412087 加熱器
19 T413632 1 T413632 托架
20 2314 H001 1 2314 H001 螺旋
|
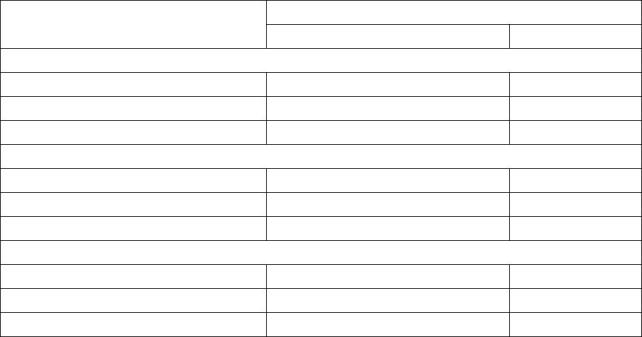
Data and dimensions |
|
Note: The information in this Workshop Manual is given as a guide for personnel engaged on engine overhauls. The dimensions which are shown are those which are mainly used in production. |
|
Injection timing |
|
Engine build list |
|
Engine type 102-05 |
|
Injection timing 25.5° ± 1° |
|
KN30305, KN30306 KN30308, KN30309 |
|
KN30304, KN30327 |
|
102-05 |
|
27.5° ± 1° |
|
KL30317, KL30318 KL30319, KL30320 KL30323, KL30324 KL30325, KL30326 |
|
103-07 |
|
17.0° ± 1° |
|
KD30238, KD30239 KD30240 |
|
103-10 103-10 103-10 103-13 103-15 103-15 104-19 104-22 104-22 |
|
23.0° ± 1° 22.5° ± 1° 18.5° ± 1° 22.5° ± 1° 22.5° ± 1° 16.0° ± 1° 21.5° ± 1° 16.0° ± 1° 20.0° ± 1° |
|
KD30241, KD30242 KD30247, KD30248 |
|
KD30245, KD30246 |
|
KH30255, KH30256 KH30273 |
|
KE30260, KE30261 KE30274 |
|
KE30262, KE30263 |
|
KF30265, KF30266 KF30276 |
|
KR30334, KR30335 |
|
KR30331, KR30332 KR30333 |
|
Note: OEM build lists can be found on the relevant service bulletin. If the timing is incorrect refer to "Fuel injection pump timing" on page 85. |
|
Workshop Manual, TPD 1377E, issue 4 |
|
15 |
|
This document has been printed from SPI². Not for Resale |
![]()
![]()

|
2 |
|
100 Series |
|
Cylinder bore dimensions |
|
Bore dimension mm (in) |
|
Engine model/Block specification |
|
Standard |
|
Service limit |
|
102-05, 103-07 |
|
New Block |
|
67,000 - 67,019 (2.63780 - 2.63854) 67,500 - 67,519 (2.65750 - 2.65822) 68,000 - 68,019 (2.67720 - 2.67791) |
|
67,2 (2.646) 67,7 (2.666) 68,2 (2.685) |
|
1st oversize bore 0,5 mm (0.2 in) 2nd oversize bore 1,0 mm (0.4 in) 103-10 |
|
New Block |
|
75,000 - 75,019 (2.95280 - 2.95350) 75,500 - 75,519 (2.97244 - 2.97318) 76,000 - 76,019 (2.99212 - 2.99287) |
|
75,2 (2.961) 75,7 (2.981) 76,2 (2.999) |
|
1st oversize bore 0,5 mm (0.2 in) 2nd oversize bore 1,0 mm (0.4 in) 103-13, 103-15, 104-19, 104-22 New Block |
|
84,000 - 84,019 (3.30710 - 3.30783) 84,500 - 84,519 (3.32677 - 3.32751) 85,000 - 85,019 (3.34650 - 3.34719) |
|
84,2 (3.315) 84,7 (3.335) 85,2 (3.354) |
|
1st oversize bore 0,5 mm (0.2 in) 2nd oversize bore 1,0 mm (0.4 in) |
|
Caution: When service limits are exceeded following a second oversize bore operation, the block must be renewed. |
|
16 |
|
Workshop Manual, TPD 1377E, issue 4 |
|
This document has been printed from SPI². Not for Resale |
![]()
![]()
![]()
![]()
![]()
|
2 |
|
100 Series |
|
Piston and piston ring dimensions |
|
Piston |
|
If the outer surface of the piston is excessively damaged (cracked, scored, or it shows signs of being burnt etc.) it must be renewed. |
|
Piston skirt |
|
1 Check the larger diameter of the piston skirt (10 mm from bottom) with reference to the following tables. |
|
102-05, 103-07, 103-10, 103-13 |
|
Diameter mm (in) Piston |
|
size |
|
102-05, 103-07 |
|
103-10 |
|
103-13 |
|
66,9375 - 66,9525 (2.6353- 2.6359) |
|
74,9325 - 74,9475 (2.950100 - 2.950690) |
|
83,948 - 83,963 (3.30503 - 3.30562) |
|
Standard |
|
0,5 mm oversize |
|
67,4375 - 67,4525 (2.6550 - 2.6556) |
|
75,4325 - 75,4475 (2.969780 - 2.970370) |
|
84,448 - 84,463 (3.32472 - 3.32531) |
|
1,0 mm oversize |
|
75,9325 - 75,9475 (2.989463 - 2.990060) |
|
84,948 - 84,963 (3.34440 - 3.34499) |
|
Not applicable |
|
103-15, 104-19, 104-22 |
|
Diameter mm (in) |
|
Piston size |
|
103-15, 104-19 |
|
104-22 |
|
83,948 - 83,963 (3.30503 - 3.30567) |
|
83,948 - 83,963 (3.30503 - 3.30562) |
|
Standard |
|
0,5 mm |
|
84,448 - 84,463 |
|
84,448 - 84,463 |
|
oversize |
|
(3.32472 - 3.32531) |
|
(3.32472 - 3.32531) |
|
1,0 mm |
|
84,948 - 84,963 |
|
84,948 - 84,963 |
|
oversize |
|
(3.34440 - 3.34499) |
|
(3.34440 - 3.34499) |
|
2 Check inside diameter (thrust direction) of the cylinder. |
|
Diameter mm (in) |
|
Engine model |
|
Standard |
|
Service limit 66,7 (2.626) 74,7 (2.941) 83,7 (3.295) |
|
102-05, 103-07 |
|
66,9375 - 66,9525 (2.6353 - 2.6359) 74,9325 - 74,9475 (2.950100 - 2.950690) 83,948 - 83,963 (3.30503 - 3.30562) |
|
103-10 |
|
103-13, 103-15, 104-19, 104-22 |
|
3 Calculate the clearance between the cylinder and piston. If this clearance is more than standard, or the piston diameter is less than the service limit, renew the piston. |
|
Clearance mm (in) Engine model |
|
Standard |
|
Service limit 0,25 (0.010) 0,25 (0.010) 0,25 (0.010) |
|
102-05, 103-07 |
|
0,048 - 0,082 (0.00189 - 0.00323) 0,0525 - 0,0865 (0.002070 - 0.003406) 0,038 - 0,072 (0.00150 - 0.00283) |
|
103-10 |
|
103-13, 103-15, 104-19, 104-22 |
|
Oversized piston |
|
When the cylinder is oversized, ensure that the correct oversized piston and piston ring set is used. |
|
Note: Ring sets are available for all pistons listed above. |
|
Workshop Manual, TPD 1377E, issue 4 |
|
17 |
|
This document has been printed from SPI². Not for Resale |
![]()
![]()


|
2 |
|
100 Series |
|
Gudgeon pin |
|
1 Check the outside diameter of the gudgeon pin. If it is less than the service limit, renew the pin. |
|
Diameter mm (in) Engine model Standard |
|
Service limit |
|
102-05, 103-07 103-10 |
|
18,998 - 19,002 (0.74795 - 0.74811) 20,998 - 21,002 (0.82669 - 0.82685) 24,996 - 25,00 (0.98410 - 0.98425) 27,996 - 28,000 (1.10220 - 1.10240) 27,996 - 28,000 (1.10220 - 1.10240) 27,996 - 28,000 (1.10220 - 1.10240) |
|
18,98 (0.7472) 20,98 (0.8259) 24,98 (0.9835) 27,98 (1.1016) 27,98 (1.1016) 27,98 (1.1016) |
|
103-13 |
|
103-15 |
|
104-19 |
|
104-22 |
|
2 Check the clearance between gudgeon pin hole and gudgeon pin. Check the inside diameter of the gudgeon pin hole and the outside diameter of the gudgeon pin, and calculate the clearance between them. If the clearance is more than the service limit, renew the piston and gudgeon pin. |
|
Clearance mm (in) Engine model |
|
Standard |
|
Service limit 0,02 (0.0008) 0,02 (0.0008) |
|
102-05, 103-07, 103-10 |
|
-0,004 to +0,004 (-0.00016 to +0.00016) -0,001 to +0,007 (-0.00040 to +0.00030) |
|
103-13, 103-15, 104-19, 104-22 |
|
18 |
|
Workshop Manual, TPD 1377E, issue 4 |
|
This document has been printed from SPI². Not for Resale |
![]()
![]()


|
2 |
|
100 Series |
|
Crankshaft deflection |
|
1 Support the crankshaft with a V-block. |
|
2 Position a dial gauge on the crankshaft centre journal, and turn the crankshaft gradually by one full turn. 3 If the gauge reading is more than the service limit correction or replacement of the crankshaft is needed. |
|
Deflection mm (in) |
|
Standard |
|
Service limit |
|
0,03 or less (0.011) |
|
0,06 (0.0023) |
|
4 If measured diameter is less than the service limit, correct by grinding and use undersized bearings and bush. |
|
Crankshaft inspection |
|
1 Check the oil seal contact face for damage or wear. 2 Check oil holes for blockage. |
|
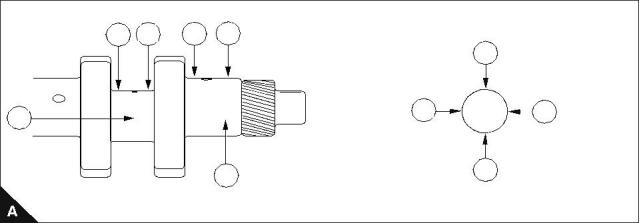
3 Check crankshaft journal (A4) and pin (A3) for stepped wear. Take measurements of diameters (A5-A5) and (A6-A6) at positions (A1) and (A2). If the maximum difference between the measurements (stepped wear) is more than the service limit of 0,05 mm (0.0019 in) then correction is required. |
|
|
|
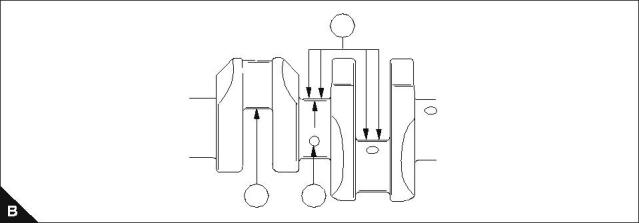
When grinding the crankshaft, work with the following specifications: |
|
Radius at pin/journal (B1): Finish precision (B2): |
|
3 mm ± 0,2 mm (0.118 in ± 0.0078 in). 1.6Z |
|
Radius around oil hole (B3): |
|
2 mm (0.0787 in) maximum/5 mm (0.196 in) minimum. |
|
Note: Use No. 400 emery cloth for final polishing. |
|
1 |
|
2 |
|
1 |
|
2 |
|
5 5 |
|
6 |
|
6 |
|
3 |
|
4 |
|
1 |
|
2 |
|
3 |
|
Workshop Manual, TPD 1377E, issue 4 |
|
19 |
|
This document has been printed from SPI². Not for Resale |
![]()
![]()

![]()
|
2 |
|
100 Series |
|
Crankshaft journal diameters |
|
Diameter mm (in) |
|
Journal No. |
|
Engine model/Journal type |
|
Standard |
|
Service limit |
|
102-05 |
|
1 2 1 2 1 2 |
|
42,964 - 42,975 (1.69150 - 1.69193) 45,948 - 45,959 (1.80897 - 1.80941) 42,714 - 42,725 (1.68165 - 1.68210) 45,698 - 45,709 (1.79913 - 1.79960) 42,464 - 42,475 (1.67181 - 1.67224) 45,448 - 45,459 (1.78930 - 1.78972) |
|
42,90 (1.689) 45,90 (1.807) 42,65 (1.679) 45,65 (1.797) 42,40 (1.669) (1) 45,40 (1.787) (1) |
|
Standard |
|
Undersize 0,25 mm (0.01 in) |
|
Undersize 0,50 mm (0.02 in) |
|
103-07 |
|
1, 2 3 |
|
42,964 - 42,975 (1.69150 - 1.69193) 45,948 - 45,959 (1.80897 - 1.80941) 42,714 - 42,725 (1.68165 - 1.68210) 45,698 - 45,709 (1.79913 - 1.79960) 42,464 - 42,475 (1.67181 - 1.67224) 45,448 - 45,459 (1.78930 - 1.78972) |
|
42,90 (1.689) 45,90 (1.807) 42,65 (1.679) 45,65 (1.797) 42,40 (1.669) (1) 45,40 (1.787) (1) |
|
Standard |
|
1, 2 3 |
|
Undersize 0,25 mm (0.01 in) Undersize 0,50 mm (0.02 in) |
|
1, 2 3 |
|
103-10 |
|
Standard |
|
1, 2, 3 1, 2, 3 1, 2, 3 |
|
45,964 - 45,975 (1.80960 - 1.81004) 45,714 - 45,725 (1.79980 - 1.80020) 45,464 - 45,475 (1.78992 - 1.79035) |
|
45,90 (1.807) 45,65 (1.797) |
|
Undersize 0,25 mm (0.01 in) Undersize 0,50 mm (0.02 in) 103-13 |
|
45,40 (1.787) (1) |
|
Standard |
|
1, 2, 3 1, 2, 3 1, 2, 3 |
|
57,957 - 57,970 (2.28177 - 2.28228) 57,707 - 57,720 (2.27192 - 2.27244) 57,457 - 57,470 (2.26210 - 2.26260) |
|
57,9 (2.280) 57,6 (2.268) |
|
Undersize 0,25 mm (0.01 in) Undersize 0,50 mm (0.02 in) 103-15 |
|
57,4 (2.260) (1) |
|
Standard |
|
1, 2, 3 1, 2, 3 1, 2, 3 |
|
67,957 - 67,970 (2.67550 - 2.67597) 67,707 - 67,720 (2.66563 - 2.66614) 67,457 - 67,470 (2.65579 - 2.65630) |
|
67,90 (2.6732) 67,65 (2.6634) 67,40 (2.6535) (1) |
|
Undersize 0,25 mm (0.01 in) Undersize 0,50 mm (0.02 in) 104-19, 104-22 |
|
Standard |
|
1, 2, 3, 4 1, 2, 3, 4 1, 2, 3, 4 |
|
67,957 - 67,970 (2.67550 - 2.67597) 67,707 - 67,720 (2.66563 - 2.66614) 67,457 - 67,470 (2.65579 - 2.65630) |
|
67,90 (2.6732) 67,65 (2.6634) 67,40 (2.6535) (1) |
|
Undersize 0,25 mm (0.01 in) Undersize 0,50 mm (0.02 in) |
|
(1) If the diameter is less than this value, the crankshaft must be renewed. |
|
20 |
|
Workshop Manual, TPD 1377E, issue 4 |
|
This document has been printed from SPI². Not for Resale |
